29. Jump ‚n‘ Run - Plattformspiele
Warnung
This chapter is out-dated. See the Simple Platformer Tutorial. Step 9 is a nice starting point. For more advanced usage, see Platformer with Physics.
Wolltest du schon immer deinen eigenen Plattformer erstellen? Es ist nicht zu schwer! Hier ist ein Beispiel für den Einstieg.
29.1. Map-Datei
29.1.1. Erstellen der Map
Zuerst brauchen wir eine Map. Dies ist eine „Map“-Datei, die mit dem Programm Tiled erstellt wurde. Das Programm ist kostenlos. Du kannst es herunterladen und zum Erstellen deiner Map-Datei verwenden.
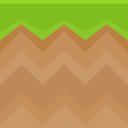
In dieser Map-Datei repräsentieren die Zahlen:
Nummer |
Gegenstand |
|---|---|
-1 |
Leeres Quadrat |
0 |
Kiste |
1 |
Linke Grasecke |
2 |
Mittlere Grasecke |
3 |
Rechte Grasecke |
Du kannst diese Kacheln (ursprünglich von kenney.nl) hier herunterladen:


Natürlich benötigen wir eine Spielfigur, die sich auf der Map herumbewegt:

Hier ist die Map-Datei:
1 2 3 4 5 6 7 | -1,-1,-1,-1,-1,-1,-1,-1,-1,-1,-1,-1,-1,-1,-1,-1,-1,-1,-1,-1,-1,-1,-1,-1,-1,1,2,3,-1,-1,-1,-1,-1,-1,-1,-1,-1,-1,-1,-1,-1,-1,-1,-1,-1,-1,-1,-1,-1,-1
-1,-1,-1,-1,-1,-1,-1,-1,-1,-1,-1,-1,-1,-1,-1,-1,-1,-1,-1,-1,-1,-1,-1,-1,-1,-1,-1,-1,-1,-1,-1,-1,-1,-1,-1,-1,-1,-1,-1,-1,-1,-1,-1,-1,-1,-1,-1,-1,-1,-1
0,-1,-1,-1,-1,-1,-1,-1,-1,-1,-1,-1,-1,-1,-1,-1,-1,-1,-1,-1,1,2,3,-1,-1,-1,-1,-1,-1,-1,1,2,3,-1,-1,-1,-1,-1,-1,-1,-1,-1,-1,-1,-1,-1,-1,-1,-1,0
0,-1,-1,-1,1,2,3,-1,-1,-1,-1,-1,-1,-1,-1,-1,0,-1,-1,-1,-1,-1,-1,-1,-1,-1,-1,-1,-1,-1,-1,0,-1,-1,-1,-1,-1,-1,-1,-1,-1,-1,0,-1,-1,-1,-1,-1,-1,0
0,-1,-1,-1,-1,-1,-1,-1,-1,-1,-1,-1,-1,-1,-1,-1,0,0,-1,-1,-1,-1,-1,-1,-1,1,2,3,-1,-1,-1,0,-1,-1,-1,-1,-1,-1,-1,-1,-1,0,0,0,-1,-1,-1,-1,-1,0
0,-1,-1,-1,-1,-1,-1,-1,-1,0,-1,-1,-1,-1,-1,0,0,0,-1,-1,-1,-1,-1,-1,-1,-1,-1,-1,-1,-1,-1,0,-1,-1,0,-1,-1,-1,-1,-1,0,0,0,0,0,-1,-1,-1,-1,0
1,2,2,2,2,2,2,2,2,2,2,2,2,2,2,2,2,2,2,2,2,2,2,2,2,2,2,2,2,2,2,2,2,2,2,2,2,2,2,2,2,2,2,2,2,2,2,2,2,3
|
Das Programm Tiled ist etwas gewöhnungsbedürftig. Sie beginnen mit einem Bildschirm wie diesem und können hier eine neue Map erstellen:

Richte dann deine Karte wie folgt ein und passe die Größe der Karte und die Größe deiner Bilder entsprechend an. (Alle deine Bilder müssen dieselbe Größe haben. Rate diese Zahl nicht, sehe dir die Eigenschaften des Bildes an und finde heraus, wie groß es ist.)
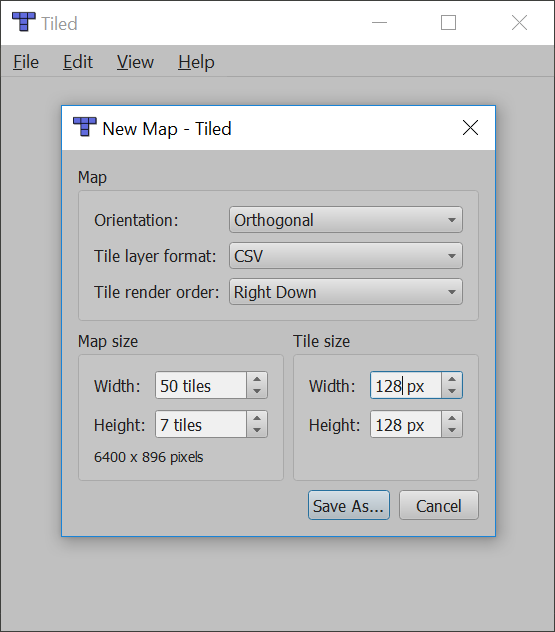
Die meisten Kacheln von kenney.nl sind 128x128 Pixel groß. Im obigen Bild habe ich eine 7 Kacheln hohe, 50 Pixel breite Side-Scroll-Karte verwendet.
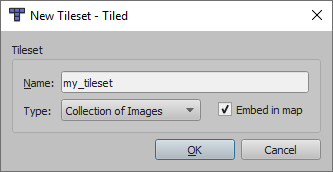
Danach musst du ein neues „tile set“ erstellen. Finde den Button dafür:

Ich benutze diese Einstellungen:
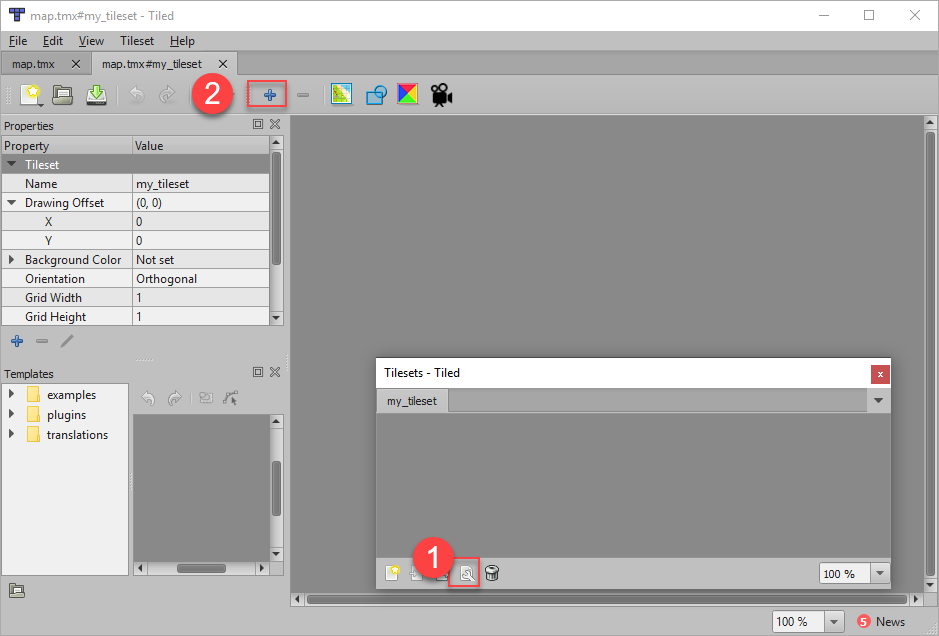
Du kannst die Bilder als Kacheln zu deinem Tileset hinzufügen. Ich finde das nicht offensichtlich, aber du klickst auf das Schraubenschlüsselsymbol und dann auf das Pluszeichen:
Diese „Kacheln“ sind alle Bilder für deine Map und die Nummern, mit denen sie verknüpft sind:
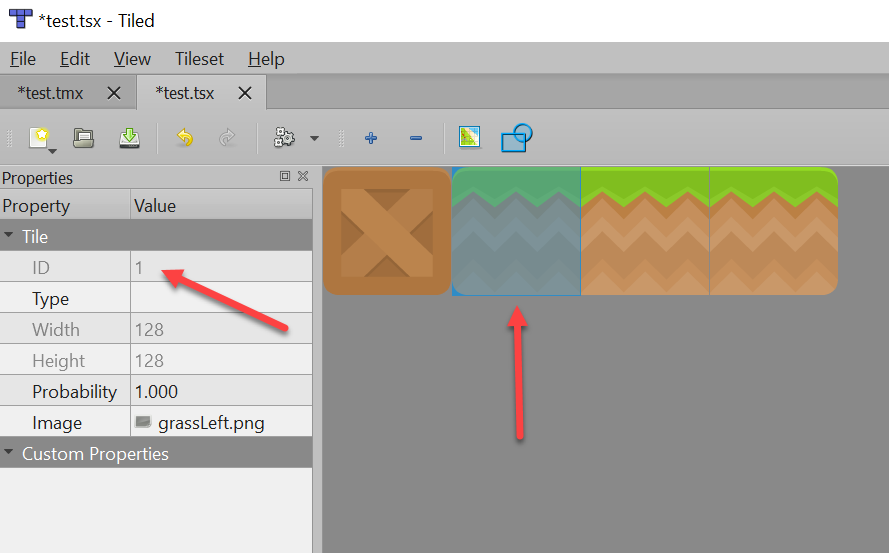
Die Nummern der Kacheln entsprechen der Reihenfolge, in der Sie die Kacheln hinzugefügt haben. Ich glaube nicht, dass Sie die Zuordnung ändern können, nachdem Sie das Tileset erstellt haben.
Als nächstes „male“ deine Karte:

Wenn du fertig bist, kannst du eine CSV-Datei exportieren.
29.1.2. Die Map lesen
Als nächstes wollen wir dieses Zahlenraster einlesen, in dem jede Zahl durch ein Komma getrennt ist. Wir wissen, wie man eine Datei einliest, aber wie verarbeitet man eine CSV-Datei?
Wir haben gelernt, wie man einen String nimmt und die Funktionen verwendet:
upper()lower()strip()
Es gibt eine weitere Funktion namens split(). Diese Funktion teilt eine Zeichenfolge auf der Grundlage eines Trennzeichens in eine Liste auf. Zum Beispiel:
1 2 3 4 5 6 7 8 | # A comma delimited string of numbers
my_text_string = "23,34,1,3,5,10"
# Split the string into a list, based on the comma as a delimiter
my_list = my_text_string.split(",")
# Print the result
print(my_list)
|
Dies gibt aus:
['23', '34', '1', '3', '5', '10']
Das ist schon fast, was wir wollen, außer dass die Liste ist aus Text und nicht Zahlen besteht.
Wir können die Liste folgendermaßen konvertieren:
# Convert from list of strings to list of integers
for i in range(len(my_list)):
    my_list[i] = int(my_list[i])
Wir haben nicht viel darüber gesprochen, aber man kann auch enumerate verwenden, um dasselbe zu erreichen:
# Convert from list of strings to list of integers
for index, item in enumerate(my_list):
    my_list[index] = int(item)
Oder man verwendet Listen-Abstraktion:
# Convert from list of strings to list of integers
my_list = [int(item) for item in my_list]
Python verfügt über integrierten Code für die Arbeit mit CSV-Dateien. Wenn du möchtest, kannst du dich in der offiziellen Dokumentation über die csv library informieren.
29.2. Plattformer-Physik-Engine
In früheren Kapiteln haben wir das PhysicsEngineSimple verwendet, um zu verhindern, dass die Spielfigur durch Wände gehen kann. Es gibt eine weitere Engine namens PhysicsEnginePlatformer für Plattformer.
Diese Engine hat zwei wichtige Ergänzungen:
Schwerkraft
can_jump-Methode
29.2.1. Schwerkraft
Das Erstellen der Plattformer-Physik-Engine erfordert eine Schwerkraftkonstante. Ich empfehle zu Beginn 0,5. Dies ist Ihre Beschleunigung in Pixel pro Frame.
self.physics_engine = arcade.PhysicsEnginePlatformer(self.player_sprite,
                                                     self.wall_list,
                                                     gravity_constant=GRAVITY)
29.2.2. Springen
Außerdem musst du oft wissen, ob sich unter deiner Figur Boden befindet, um zu wissen, ob sie springen kann. Die Physik-Engine hat dafür eine Methode:
if self.physics_engine.can_jump():
    self.player_sprite.change_y = JUMP_SPEED
29.3. Python-Programm
Sieh dir im hervorgehobenen Code unten an, wie wir diese Konzepte implementiert haben, um einen Plattformer zu erstellen.
1 2 3 4 5 6 7 8 9 10 11 12 13 14 15 16 17 18 19 20 21 22 23 24 25 26 27 28 29 30 31 32 33 34 35 36 37 38 39 40 41 42 43 44 45 46 47 48 49 50 51 52 53 54 55 56 57 58 59 60 61 62 63 64 65 66 67 68 69 70 71 72 73 74 75 76 77 78 79 80 81 82 83 84 85 86 87 88 89 90 91 92 93 94 95 96 97 98 99 100 101 102 103 104 105 106 107 108 109 110 111 112 113 114 115 116 117 118 119 120 121 122 123 124 125 126 127 128 129 130 131 132 133 134 135 136 137 138 139 140 141 142 143 144 145 146 147 148 149 150 151 152 153 154 155 156 157 158 159 160 161 162 163 164 165 166 167 168 169 170 171 172 173 174 175 176 177 178 179 180 181 182 183 184 185 186 187 188 189 190 191 192 193 194 195 196 197 198 199 200 201 202 203 204 205 206 207 208 209 210 211 212 213 214 215 216 217 218 219 220 221 222 223 224 225 226 227 228 229 230 | """
Load a map stored in csv format, as exported by the program 'Tiled.'
Artwork from: http://kenney.nl
Tiled available from: http://www.mapeditor.org/
"""
import arcade
SPRITE_SCALING = 0.5
SCREEN_WIDTH = 800
SCREEN_HEIGHT = 600
# How many pixels to keep as a minimum margin between the character
# and the edge of the screen.
VIEWPORT_MARGIN = 40
RIGHT_MARGIN = 150
TILE_SIZE = 128
SCALED_TILE_SIZE = TILE_SIZE * SPRITE_SCALING
MAP_HEIGHT = 7
# Physics
MOVEMENT_SPEED = 5
JUMP_SPEED = 14
GRAVITY = 0.5
def get_map(filename):
"""
This function loads an array based on a map stored as a list of
numbers separated by commas.
"""
# Open the file
map_file = open(filename)
# Create an empty list of rows that will hold our map
map_array = []
# Read in a line from the file
for line in map_file:
# Strip the whitespace, and \n at the end
line = line.strip()
# This creates a list by splitting line everywhere there is a comma.
map_row = line.split(",")
# The list currently has all the numbers stored as text, and we want it
# as a number. (e.g. We want 1 not "1"). So loop through and convert
# to an integer.
for index, item in enumerate(map_row):
map_row[index] = int(item)
# Now that we've completed processing the row, add it to our map array.
map_array.append(map_row)
# Done, return the map.
return map_array
class MyWindow(arcade.Window):
""" Main application class. """
def __init__(self):
"""
Initializer
"""
# Call the parent class
super().__init__(SCREEN_WIDTH, SCREEN_HEIGHT)
# Sprite lists
self.player_list = None
self.wall_list = None
# Set up the player
self.player_sprite = None
# Physics engine
self.physics_engine = None
# Used for scrolling map
self.view_left = 0
self.view_bottom = 0
def setup(self):
""" Set up the game and initialize the variables. """
# Sprite lists
self.player_list = arcade.SpriteList()
self.wall_list = arcade.SpriteList()
# Set up the player
self.player_sprite = arcade.Sprite("character.png", SPRITE_SCALING)
# Starting position of the player
self.player_sprite.center_x = 90
self.player_sprite.center_y = 270
self.player_list.append(self.player_sprite)
# Get a 2D array made of numbers based on the map
map_array = get_map("map.csv")
# Now that we've got the map, loop through and create the sprites
for row_index in range(len(map_array)):
for column_index in range(len(map_array[row_index])):
item = map_array[row_index][column_index]
# For this map, the numbers represent:
# -1 = empty
# 0 = box
# 1 = grass left edge
# 2 = grass middle
# 3 = grass right edge
if item == 0:
wall = arcade.Sprite("boxCrate_double.png", SPRITE_SCALING)
elif item == 1:
wall = arcade.Sprite("grassLeft.png", SPRITE_SCALING)
elif item == 2:
wall = arcade.Sprite("grassMid.png", SPRITE_SCALING)
elif item == 3:
wall = arcade.Sprite("grassRight.png", SPRITE_SCALING)
if item >= 0:
# Calculate where the sprite goes
wall.left = column_index * SCALED_TILE_SIZE
wall.top = (MAP_HEIGHT - row_index) * SCALED_TILE_SIZE
# Add the sprite
self.wall_list.append(wall)
# Create out platformer physics engine with gravity
self.physics_engine = arcade.PhysicsEnginePlatformer(self.player_sprite,
self.wall_list,
gravity_constant=GRAVITY)
# Set the background color
arcade.set_background_color(arcade.color.AMAZON)
# Set the view port boundaries
# These numbers set where we have 'scrolled' to.
self.view_left = 0
self.view_bottom = 0
def on_draw(self):
"""
Render the screen.
"""
# This command has to happen before we start drawing
arcade.start_render()
# Draw all the sprites.
self.wall_list.draw()
self.player_list.draw()
def on_key_press(self, key, modifiers):
"""
Called whenever the mouse moves.
"""
if key == arcade.key.UP:
# This line below is new. It checks to make sure there is a platform underneath
# the player. Because you can't jump if there isn't ground beneath your feet.
if self.physics_engine.can_jump():
self.player_sprite.change_y = JUMP_SPEED
elif key == arcade.key.LEFT:
self.player_sprite.change_x = -MOVEMENT_SPEED
elif key == arcade.key.RIGHT:
self.player_sprite.change_x = MOVEMENT_SPEED
def on_key_release(self, key, modifiers):
"""
Called when the user presses a mouse button.
"""
if key == arcade.key.LEFT or key == arcade.key.RIGHT:
self.player_sprite.change_x = 0
def update(self, delta_time):
""" Movement and game logic """
self.physics_engine.update()
# --- Manage Scrolling ---
# Track if we need to change the view port
changed = False
# Scroll left
left_bndry = self.view_left + VIEWPORT_MARGIN
if self.player_sprite.left < left_bndry:
self.view_left -= left_bndry - self.player_sprite.left
changed = True
# Scroll right
right_bndry = self.view_left + SCREEN_WIDTH - RIGHT_MARGIN
if self.player_sprite.right > right_bndry:
self.view_left += self.player_sprite.right - right_bndry
changed = True
# Scroll up
top_bndry = self.view_bottom + SCREEN_HEIGHT - VIEWPORT_MARGIN
if self.player_sprite.top > top_bndry:
self.view_bottom += self.player_sprite.top - top_bndry
changed = True
# Scroll down
bottom_bndry = self.view_bottom + VIEWPORT_MARGIN
if self.player_sprite.bottom < bottom_bndry:
self.view_bottom -= bottom_bndry - self.player_sprite.bottom
changed = True
# If we need to scroll, go ahead and do it.
if changed:
arcade.set_viewport(self.view_left,
SCREEN_WIDTH + self.view_left,
self.view_bottom,
SCREEN_HEIGHT + self.view_bottom)
def main():
window = MyWindow()
window.setup()
arcade.run()
main()
|
29.4. Andere Beispiele
Wenn du nach Plattformen suchst, die sich bewegen, lies Sprite Moving Platforms.
Wenn du in der Lage sein möchtest, Rampen zu erstellen, die du rauf und runter laufen kannst, lies Sprite Ramps.